

Are you facing the “Audio or Sound Not Working” and “Audio Cuts Off/Desyncs and Stopping” issue in Wild Hearts?
Wild Hearts has started to be played by many players with its release today.
For some players, this is not exactly heartwarming.
Wild Hearts players run the game and observe that in-game sounds are not working.
In this guide, we will provide information on how to fix Wild Hearts Audio or Sound Not Working.
- Why Is Wild Hearts Audio or Sound Not Working?
- How To Fix Wild Hearts Audio or Sound Not Working?
- Fix 1: Restart The Game
- Fix 2: Check The Volume Mixer
- Fix 3: Cap The FPS At 60
- Fix 4: Get The Game To High Performance
- Fix 5: Choose the Right Audio Device
- Fix 6: Adjust The Sound Sample Rate
- Fix 7: Reconnect the Controller
- Fix 8: Turn Off Spatial Sound
- Fix 9: Disable Oculus/Voicemeeter
- Fix 10: Uncheck Handsfree Telephony
- Fix 11: Install Audio Driver
- Fix 12: Verify Game File Integrity
Why Is Wild Hearts Audio or Sound Not Working?
Wild Hearts players are unable to enjoy the game by encountering in-game Audio Cuts Off or Desyncs and Stops.
Wild Hearts in-game audio or sound not working can happen due to many issues.
That’s why we’re going to try to give you a solution by talking about a few suggestions.
How To Fix Wild Hearts Audio or Sound Not Working?
In this title, we mentioned a few suggestions and provided information on how to fix the problem.
Fix 1: Restart The Game
The problem with the game cache can cause us to encounter various audio errors like this.
We can fix it by restarting the game so that we clear the cache files.
If the game is open in the background, close it completely with the help of a task manager and start it again.
Fix 2: Check The Volume Mixer
Muting Volume Mixer for Wild Hearts game may cause us to encounter such problems.
Therefore, we need to control it using a Volume Mixer.
- First, run the game.
- Right click on the sound icon located in the lower right corner.
- Click “Open Volume Mixer” in the listed options.
- Check whether the “Wild Hearts” game sound on the screen that opens is low.
If the Wild Hearts game is muted, enable it and check.
Fix 3: Cap The FPS At 60
If the in-game sound is heard but the sound is constantly interrupted, your game may be stuttering.
Your game freezing can cause us to encounter various sound problems like this one.
For this, we can eliminate the problem by fixing the FPS to 60.
- Open the Wild Hearts game.
- Open the in-game settings and access the “Graphics” menu.
- Set the “FPS Limit” option in the menu to “60“.
- Then set the “Preset” option below to “Lowest” or “Low“. (If your system is low)
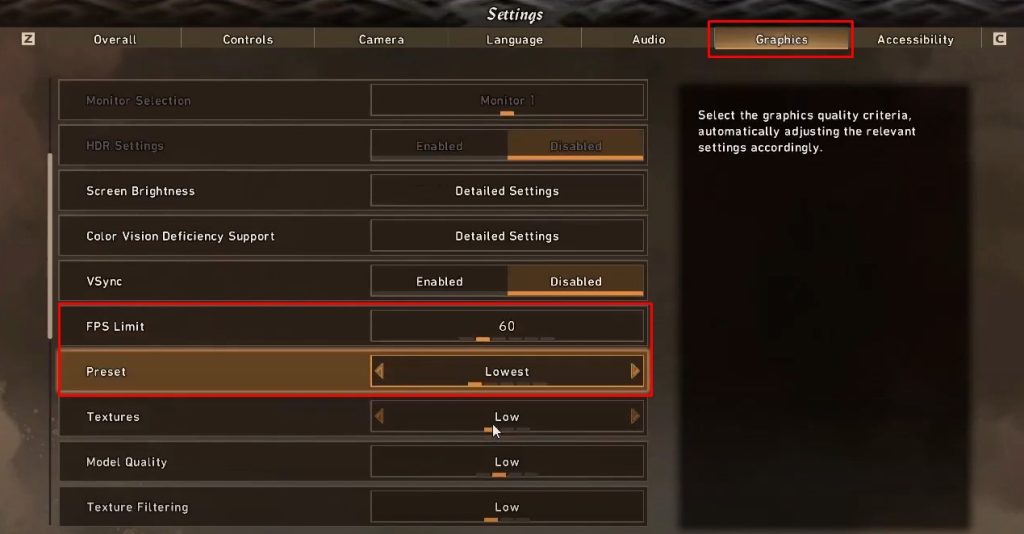
After saving the settings, check if the problem persists.
Fix 4: Get The Game To High Performance
Again, if there is in-game freezing or slowness, you may encounter sound problems.
By applying the high performance setting to the game, we can eliminate the problem of in-game freezing and slowness.
- Type “Graphics Settings” in the start search screen and open it.
- Click on the “Browse” option on the screen that opens.
- Then go to the directory where the “Wild Hearts” game is installed and add the “WILD HEARTS.exe” application.
- After adding the game, select “Wild Hearts” and click the “Options” button.
- Check the “High Performance” option on the screen that opens and click the “Save” button.
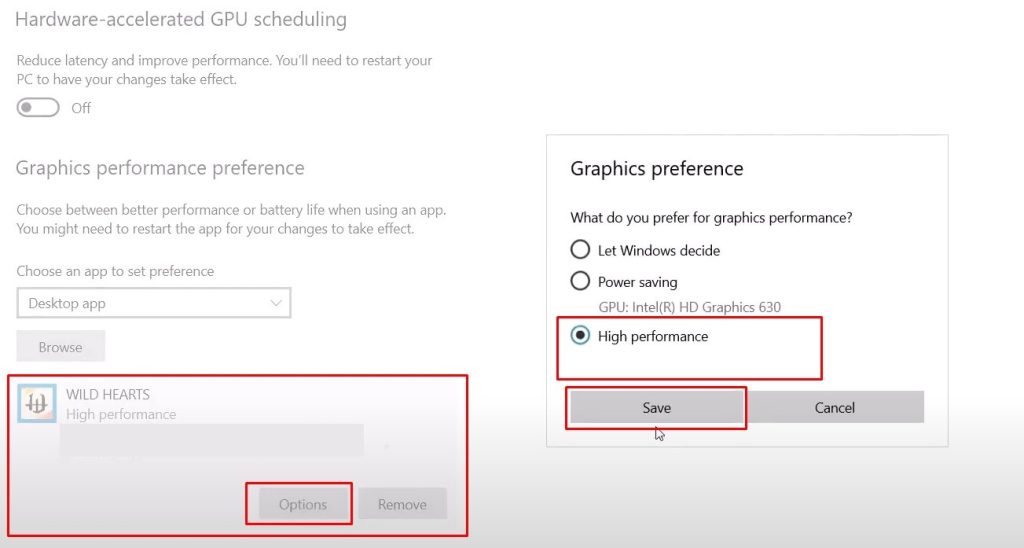
After applying the settings, run the game and check if the problem persists.
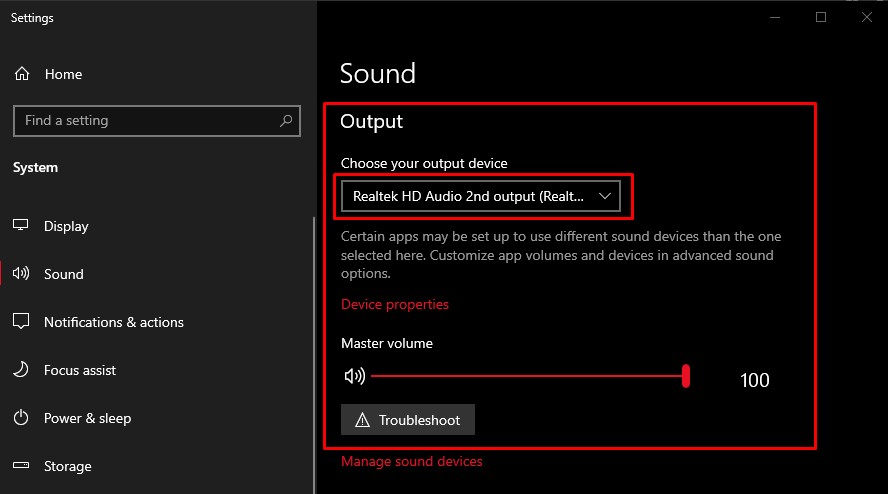
Fix 5: Choose the Right Audio Device
Check that the audio device is correctly identified in the Sound Settings.
Not identifying the audio device correctly can cause us to encounter various audio issues like this.
You can control the audio device by following the step below.
- Right click on the sound icon located in the lower right corner.
- Click “Sound Settings” in the listed options.
- Under the “Output” heading on the screen that opens, set the appropriate audio device as default.
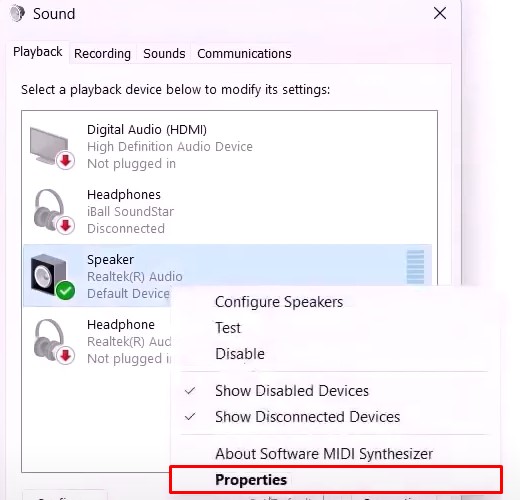
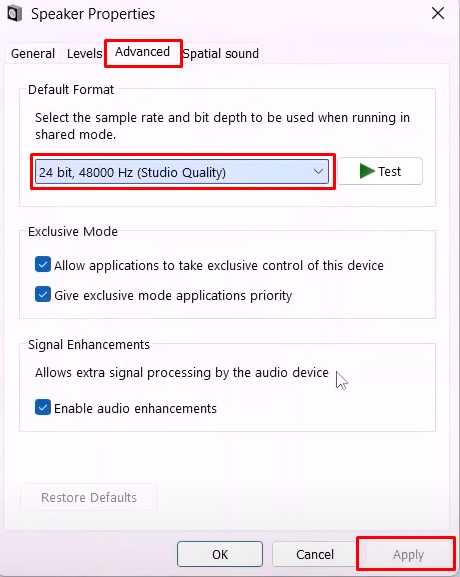
Fix 6: Adjust The Sound Sample Rate
We can eliminate the problem by increasing the audio sampling rate.
We can adjust the Sound Sample Rate setting by following the steps below.
- Type “Control Panel” in the start search screen and open it.
- Click “Hardware and Sound > Sound“.
- Right-click on your default audio device in the menu that opens and click “Properties“.
Then click on the “Advanced” option and set the “4800 Hz” option by clicking the drop-down menu under the “Default Format” heading.
Click the “Apply” button to save the setting.
Fix 7: Reconnect the Controller
If you are playing the game with the controller, the game may not be fully connected.
You can check by reconnecting the controller so that it can read the controller connection again.
Unplug your controller and check it by connecting it again after the sound is heard.
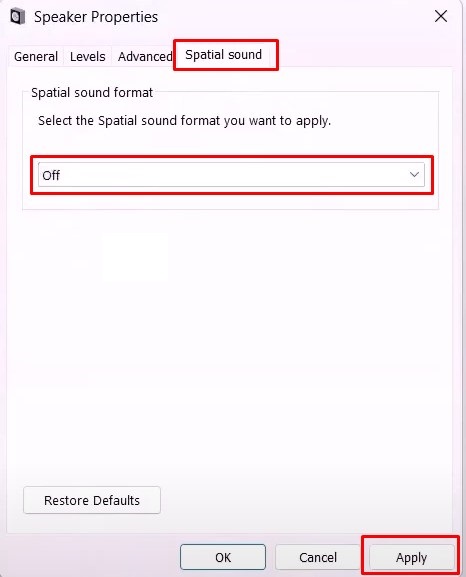
Fix 8: Turn Off Spatial Sound
Having Spatial Sound turned on can cause us to encounter various in-game sound issues like this.
You can follow the step below to turn off Spatial Sound.
- Type “Control Panel” in the start search screen and open it.
- Click “Hardware and Sound > Sound“.
- Right-click on your default audio device in the menu that opens and click “Properties“.
- Click the “Spatial Sound” option on the screen that opens and click the drop-down menu under the “Spatial sound format” heading and set it to “Off“.
- Click the “Apply” button to save the setting.
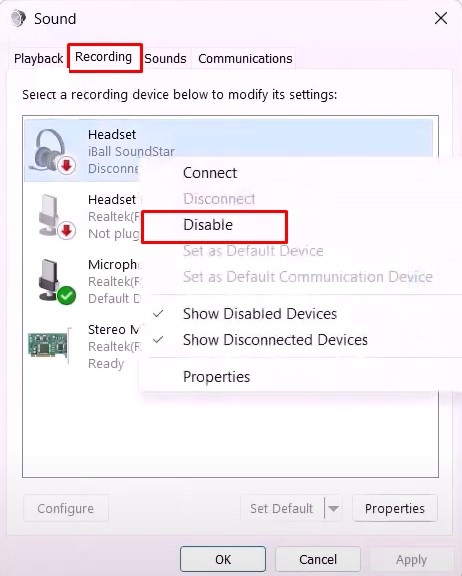
Fix 9: Disable Oculus/Voicemeeter
Having Oculus/voice meeter enabled can cause you to encounter various in-game audio issues like these.
You can follow the steps below to disable Oculus/voice meeter.
- Type “Control Panel” in the start search screen and open it.
- Click “Hardware and Sound > Sound“.
- On the devices you reach the “Playback” menu and use, set them to “Disable“.
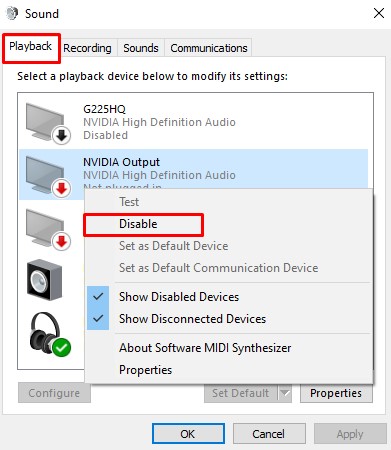
- After performing this operation, reach the “Recording” menu and follow the same procedure.
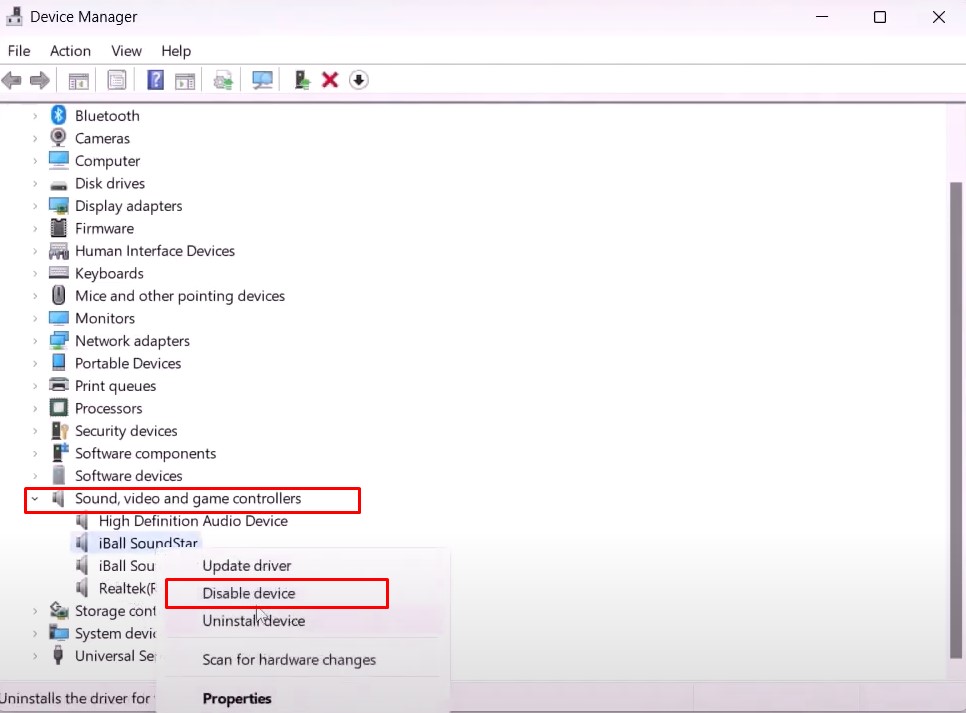
- Then type “Device Manager” in the start search screen and open it.
- Expand “Sound, video and game controllers“.
- Right click on the one you are not using from the listed Controller and click on “Disable Device“.
Fix 10: Uncheck Handsfree Telephony
If you are getting sound with a bluetooth device, you can find a solution to the problem by disabling “Handsfree Telephony“.
You can follow the below step to disable “Handsfree Telephony“.
- Type “Control Panel” in the start search screen and open it.
- Click “Hardware and Sound > Devices and Printers“.
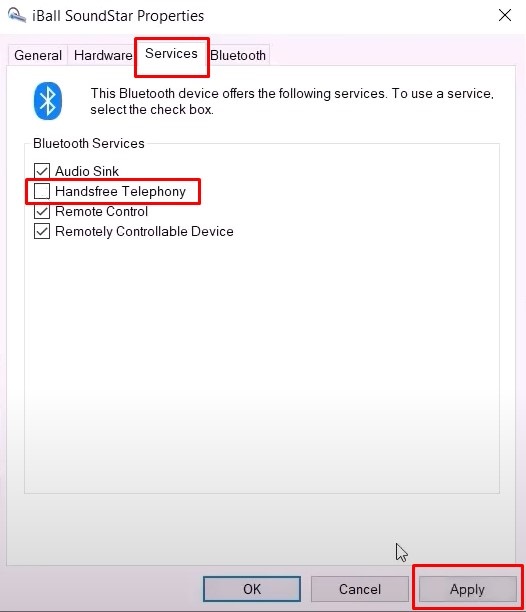
- Then right click on your bluetooth audio device and click “Properties“.
- Uncheck “Handsfree Telephony” by clicking “Services“.
- Click the “Apply” button to save the setting.
Fix 11: Install Audio Driver
If your audio device is out of date, it can cause you to encounter various sound problems like this.
You can follow the step below to update the audio device.
- Type “Device Manager” in the search screen and open it.
- Expand “Sound, video and game controllers“.
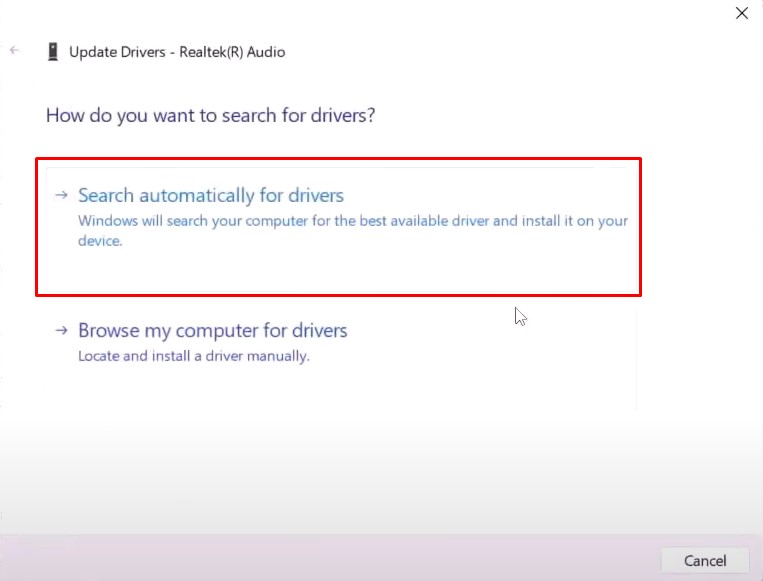
- Then right click on your audio device and click “Update driver“.

- Click on the “Search automatically for drivers” option on the screen that opens.
If the device says up to date, you can do the other suggestion.
- Right click on the audio device you want to update again and click “Update Driver“.
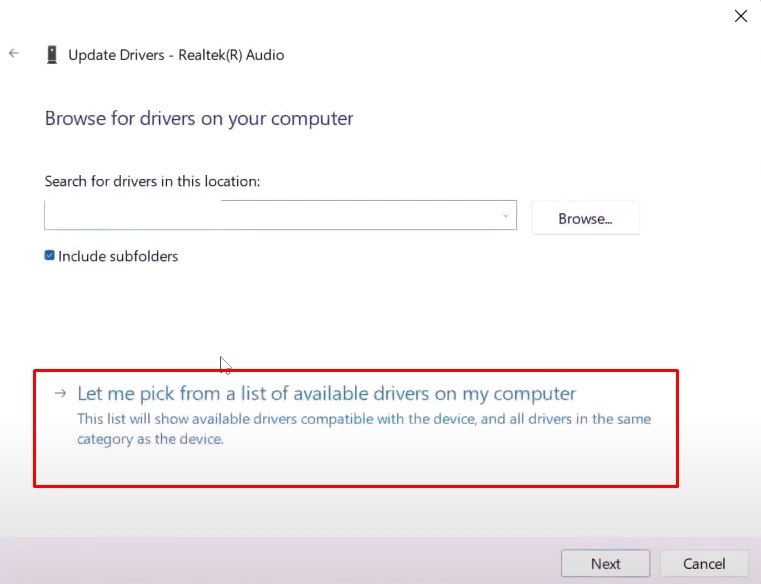
- Click on the “Browse my computer for drivers” option on the screen that opens.
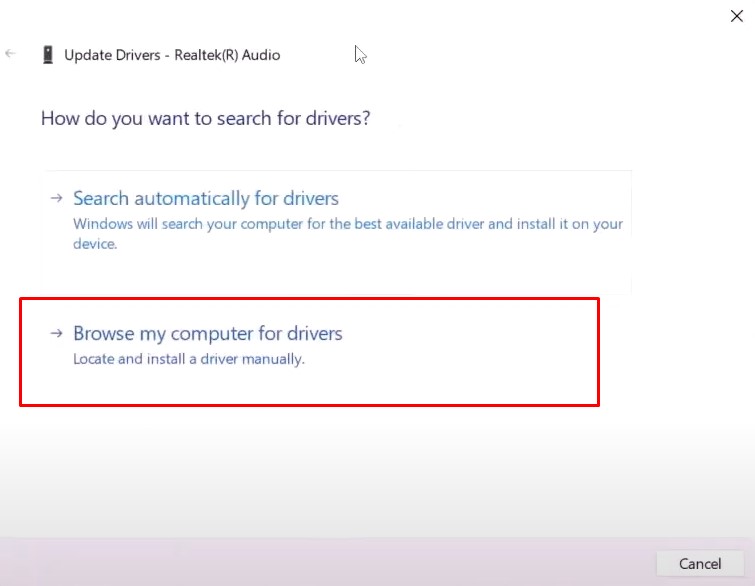
- Click “Let me pick from a list of available drivers on my computer”.
On the screen that opens, select the model according to the name of your sound card, click the “Next” button and install.
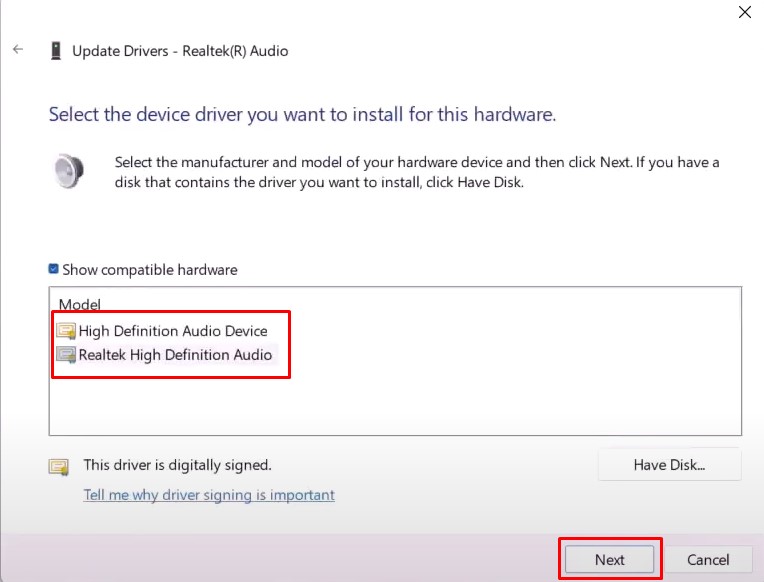
For example, if your sound card is named “Realtek“, select “Realtek High Definition Audio“.
If the name of your sound card is “High Definition“, select “High Definition Audio” and proceed.
Fix 12: Verify Game File Integrity
Loss or corruption in game files can cause us to encounter various errors like this.
Verifying game file integrity will help fix various in-game errors.
You can follow the step below for us to verify the game files.
For Steam users;
- Run the Steam application.
- Access the library menu.
- Right click on the Wild Hearts game and access the “Properties” menu.
- Click on “Local Files” on the left.
- Click the “Verify integrity of game files” button and verify.
For EA Desktop users;
- Run the EA Desktop application.
- Select the game “Wild Hearts” located on the left.
- Click on the “Manage” option on the screen that opens.
- After this process, click the “Repair” button.
Wait until the verification process is complete. After the process is complete, run the game and check.