
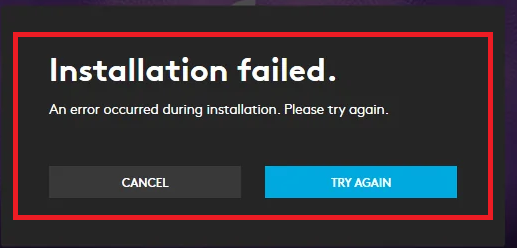
Are you getting a “Installation Failed. An error occurred during installation. Please try again.” error when installing Logitech G Hub app?
Logitech G Hub allows users who own their own product to make many personalized settings within the enhanced application.
However, Logitech users state that they encounter an “Installation Failed” error when they try to install the application.
In this guide, we will provide information on how to fix the Logitech G Hub “Installation Failed” error.
- What is Logitech G Hub Installation Failed Error?
- How To Fix Logitech G Hub Installation Failed Error?
- Fix 1: Delete Logitech Folder
- Fix 2: Run as Administrator
- Fix 3: Add Setup File as Exclude
- Fix 4: Allow Windows Defender Firewall
- Fix 5: Use Default Google DNS Server
- Fix 6: Clear Internet Cache
- Fix 7: Download Setup File Again
What is Logitech G Hub Installation Failed Error?
The Logitech G Hub Installation Failed error occurs because the previously installed software cannot be overwritten.
Also, if the firewall blocks the remote server, it may restrict the cloud download, causing the installation to fail.
Unstable Internet can cause “Installation Failed” error.
How To Fix Logitech G Hub Installation Failed Error?
In this topic, we will provide information on how to fix the Logitech G Hub “Installation Failed” error.
Fix 1: Delete Logitech Folder
Not deleting some folders properly after preloading and deleting the Logitech G Hub folder can cause various errors like this one.
We can eliminate the problem by checking if some files are present.
- Type “Run” in the start search screen and open it.
- On the screen that opens, type “%localappdata%” in the box and open it.
- In the new window that opens, delete the “LGHUB” and “Logitech” folders, if any.
- Then come to the run screen again and type “%appdata%” and open it.
- In the new window that opens, delete the “lghub” and “Logitech” folders, if any.
- Then delete the “C:/Program Files/LGHUB” and “C:/Program Files/Logitech” folders.
After deleting the folders, you can check by running the setup application.
Fix 2: Run as Administrator
Failure to run Setup as an administrator may prevent connection access to the remote server.
To give full access to access, you can run the application as an administrator and eliminate the problem.
Right-click the Logitech G Hub Setup application and click “Run as Administrator“.
Then check if the problem persists.
Fix 3: Add Setup File as Exclude
The setup file blocked by Windows Defender can cause various problems like this.
We can use the exclusion plugin included in Windows Defender to avoid setup file blocking.
- Type “Virus & threat protection” in the start search screen and open it.
- Click on “Manage Settings“.
- Then scroll down the menu and click “Add or remove exclusions“.
- Click the “Add an exclusion” button and select the “File” option.
- After this process, select and save the Logitech G Hub Setup file.
After saving, let’s turn off real-time protection.
Let’s go back to the previous menu and disable “Real-time protection” above.
After saving the settings, run the Setup application and check.
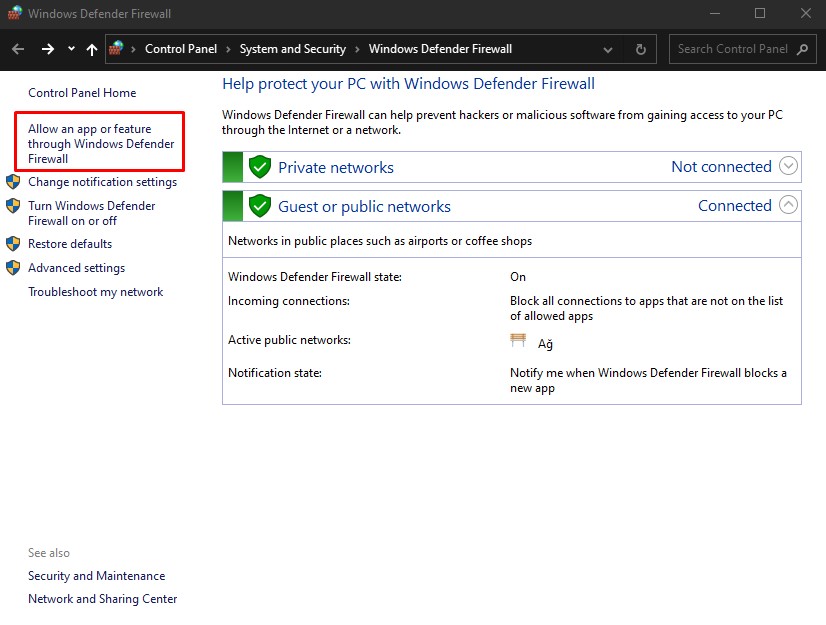
Fix 4: Allow Windows Defender Firewall
Rejecting the connection request to the remote server by Windows Defender Firewall can cause you to encounter various errors like this.
In order to prevent the connection request from being rejected, we need to allow the setup file through Windows Defender Firewall.
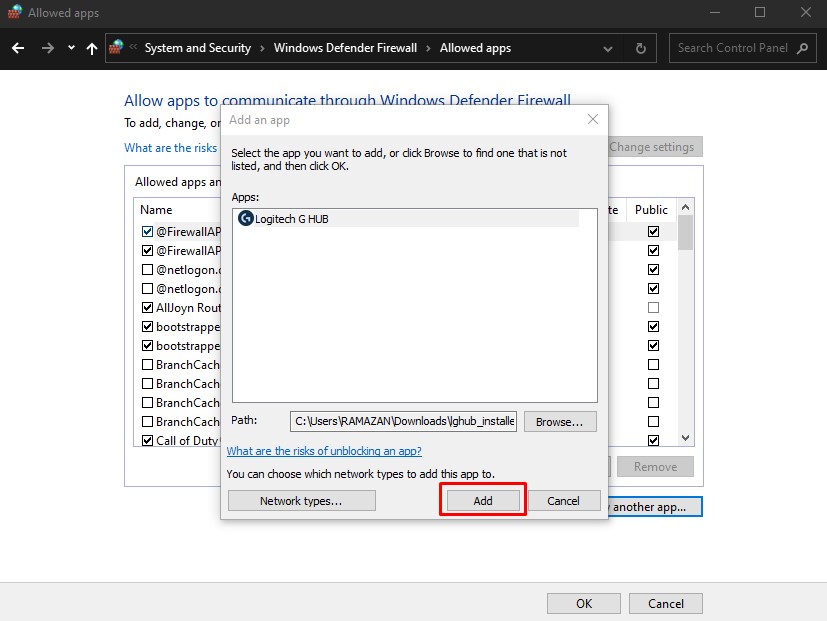
- Type “Windows Defender Firewall” in the start search screen and open it.
- In the new window that opens, click “Allow an app or feature through Windows Defender Firewall“.
- Then click “Change Settings” and “Allow another app” button respectively.
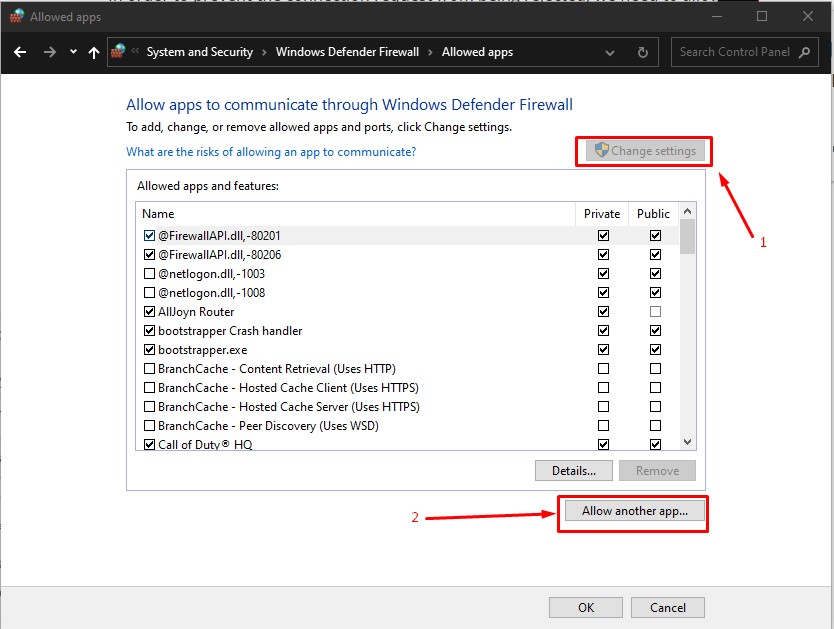
- Click the “Browse” button in the window that opens and select the Logitech G Hub Setup program.

- After selecting the program, click the “Add” button and add it.
- Then enable “Private” and “Public” option of “Logitech G HUB” and click “OK” button to save.
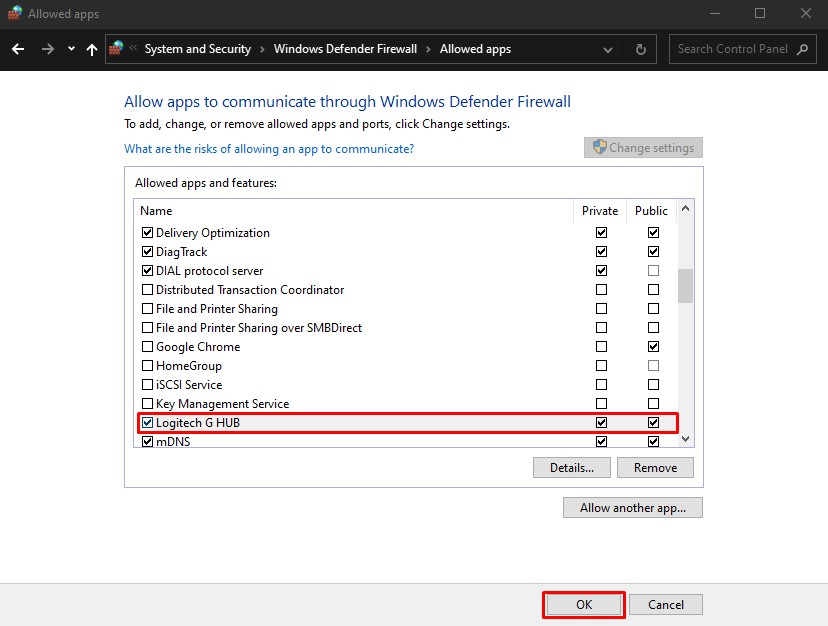
After performing the save process, run Logitech G Hub Setup to see if the issue persists.
Fix 5: Use Default Google DNS Server
We can avoid connection request problems by using the default Google DNS server.
- If Logitech G Hub is on as a priority, turn it off.
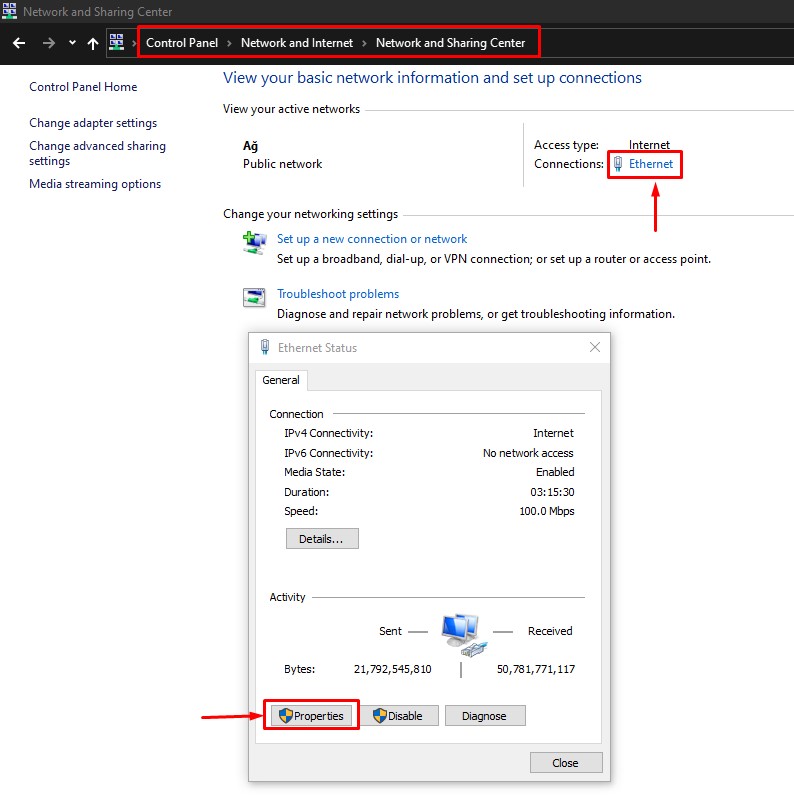
- Type “Control Panel” in the start search screen and open it.
- Click on the “Network and Internet” category title.
- Then click on the “Network and Sharing Center” heading.
- Click on the internet information next to “Connections:” on the screen that opens.
- Then click the “Properties” button.
- Double-click “Internet Protocol Version 4 (TCP/IPv4)“.
- Then check the “Use the following DNS server address:” option and type the address we left below.
- Preferred DNS server: 8.8.8.8
- Alternate DNS server: 8.8.4.4
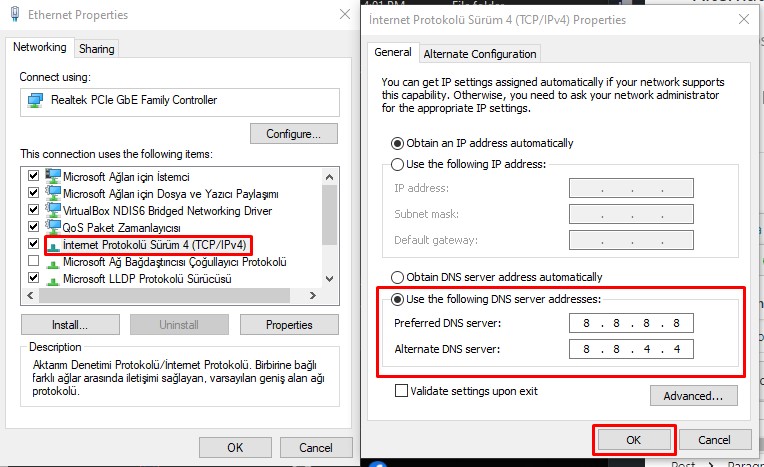
Click the “OK” button to save the setting and check.
Fix 6: Clear Internet Cache
Problems with the internet cache can cause us to encounter various errors like this.
You can follow the below step to clear the internet cache.
- Type “cmd” in the start search screen and run as administrator.
- Paste the following codes in the command prompt window that opens and press enter.
- ipconfig /renew
- ipconfig /flushdns
- netsh int ipv4 reset
- netsh int ipv6 reset
- netsh winhttp reset proxy
- netsh winsock reset
- ipconfig /registerdns
After the process is complete, you can restart the computer and check if the problem persists.
Fix 7: Download Setup File Again
Incorrect download of Logitech G Hub Setup file can cause various errors like this one.
Re-downloading the incorrectly downloaded file for correction will eliminate the problem.
- First, access the Logitech G Hub site. https://www.logitechg.com/en-us/innovation/g-hub.html
- Click the “Download For Windows 10” button on the link and download it.
Then run the downloaded Setup file and check if the problem persists.