Hogwarts Legacy Deluxe players perform the test by accessing the game 3 days before it is shared.
With early access, the “Black Screen” problem encountered after running the game can happen to many players.
In this guide, we tried to solve it by mentioning a few suggestions to fix the “Black Screen” issue that Hogwarts Legacy players encounter after running the game or in-game.
- What is the Hogwarts Legacy With Black Screen Error?
- How To Fix Hogwarts Legacy Black Screen?
- Fix 1: Update Graphics Driver
- Fix 2: Turn off Graphics Card Overclocking
- Fix 3: Install .Net Framework
- Fix 4: Verify Game File Integrity
- Fix 5: Restart The Computer
What is the Hogwarts Legacy With Black Screen Error?
One of the main reasons for encountering a black screen in the game is due to the fact that the graphics driver is out of date.
In addition, the fact that the DirectX library is not installed on the computer can cause us to encounter various errors like this.
Due to many problems like this, we will give you some suggestions on how to fix the problem by mentioning a few suggestions.
How To Fix Hogwarts Legacy Black Screen?
Under this heading, we have made suggestions on how to fix the problem.
You can reach a temporary or permanent solution by following the steps below.
Fix 1: Update Graphics Driver
The fact that the graphics driver is not up-to-date causes the version to be unsupported for the newly released game and many errors are encountered in the game.
Therefore, we will need to check if the graphics driver is up to date.
You can follow the step below to check if the graphics driver is up to date.
If You Are Using AMD Graphics Card;
- Access the AMD Radeon Software site by clicking the link I left on the side. Click to access AMD Radeon Software site.
- Select the “Graphics” option in the link, select the video card model, and click the “Submit” button.
- Then download the driver and perform the installation process.
- Restart your computer after the installation is complete.
- Right click on the desktop and select “AMD Radeon Software“.
- Check if your graphics card driver is up to date in the application that opens.
- If a new update is available, download and install it.
If You Are Using NVIDIA Graphics Card;
- Access the Geforce Experience site by clicking the link I left on the side. Click to access Geforce Experience site.
- Click the “Download Now” button in the link and download the application and perform the installation process.
- After the installation is complete, run the application and register and log in.
- Click on “Drivers” at the top.
- Then click “Check for Updates” to check if your driver is up to date.
- If a new update is available, the current update version will appear.
- After downloading the current update version, perform the installation process and restart the computer.
After following the steps, run the game and check.
Fix 2: Turn off Graphics Card Overclocking
This recommendation applies to users who have already overclocked their graphics card.
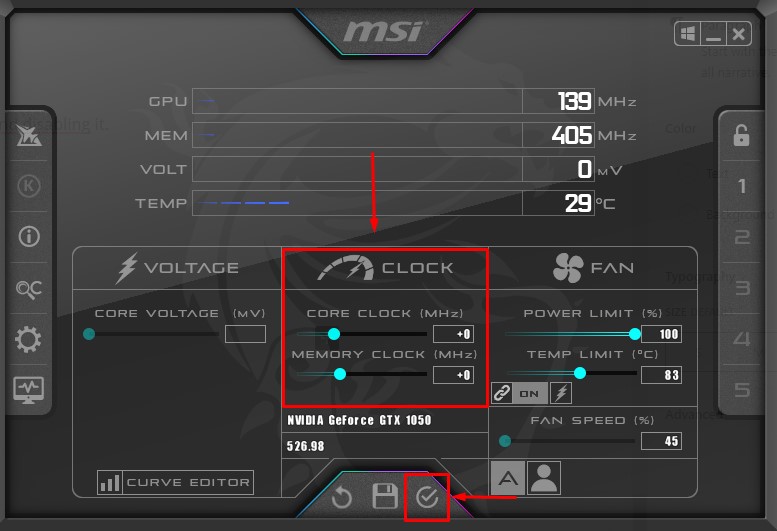
If you have overclocked your graphics card with the help of MSI Afterburner, we recommend disabling it.
Follow the step below to disable graphics card overclocking.
- Run MSI Afterburner.
- Then set “Core Clock” and “Memory Clock” to “0“.
- Save by clicking the confirm button below.

After the process is complete, run the game and check.
Fix 3: Install .Net Framework
Since many games developed make use of the .Net Framework library, we need to provide control.
The lack of .Net Framework on the device can cause us to encounter various problems like this.
To install .Net Framework, you can download and install it by clicking the link listed below.
- Microsoft Visual C++ Redistributable (X86)
- Microsoft Visual C++ Redistributable (X64)
- DirectX End-User Runtime Web Installer
Click on the 3 links we left above and perform the download process.
After the download is complete, run the setup files and perform the installation process.
If it is already installed on your device, you can repair it by clicking the “Repair” button.
After the installation is complete, restart the computer and check.
Fix 4: Verify Game File Integrity
Loss or corruption in game files can cause us to encounter various errors like this.
Verifying game file integrity will help fix various in-game errors.
You can follow the step below for us to verify the game files.
File Verification for Steam;
- Run the Steam application.
- Access the library menu.
- Right click on the Hogwarts Legacy game and access the “Properties” menu.
- Click on “Local Files” on the left.
- Click the “Verify integrity of game files” button and verify.
Wait until the verification process is complete. After the process is complete, run the game and check.
File Verification for Epic Games;
- Run the Epic Games Launcher application.
- Access the library menu.
- Click on the three dots at the bottom of the game.
- Then click “Manage” to access the management tool.
- Start the verification process by clicking the “Verify” button in the window that opens.
After the verification process is complete, run the game and check.
Fix 5: Restart The Computer
Restarting the computer will help us avoid potential errors.
This can happen because some cache files or services created in the background are running problematic.
To repair problematic running services or damaged cache files, restarting the computer may fix the error.
Restart the computer and run the game to see if the problem persists.


